


Default Tenant Setup
The Default Tenant Setup page is shown when you attempt to access the POS Server site for the first time.
This page will gather options from you to create the first tenant within POS. Understanding what a tenant provides is an important consideration on how you configure your default tenant.
Multi-Tenancy
A tenant is like a virtual site – a single POS installation has the ability to support multiple tenants, so you can effectively run multiple sites using the same software install.
Fusion typically uses POS’s multi-tenancy support when it hosts client sites in the Fusion Cloud.
You may also find multi-tenancy helpful at your Corporate site. For example, this may be the case if you want to have multiple sites for production, staging, and testing.
On the other hand, POS installations at stores don’t necessarily need multi-tenant support.
The choice of whether you want to support multi-tenancy as a few implications on the type of database that you select for setup of the first tenant.
Common Setup Options
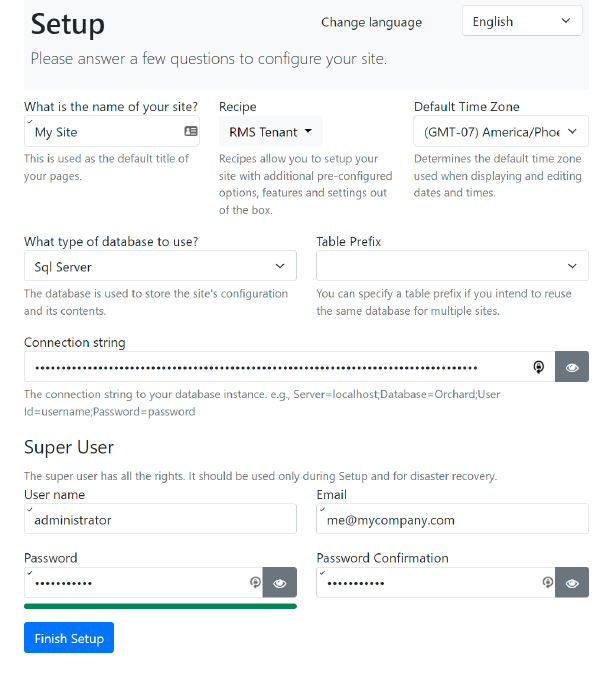
Common setup options are as follows:
- Name
- Enter a descriptive title for the tenant.
- This value will be used as the default title of web pages served by the site.
- For a corporate server install, you’ll typically enter your organization name.
- For a store server install, you’ll typically enter your store ID.
- Recipe
- Choose POS_Tenant.
- Default Time Zone
- This should be the default time zone from which your organization operates.
- When integrated with current version of the Fusion Register, the time zones for all POS tenants and installations within the organization must be the same.
- Table Prefix
- Leave this blank.
- Super User UserName
- Use Administrator.
- This is the username of the super user that has administrative access to all tenant features.
- Password
- Enter a secure password.
- Email
- Enter the email address, enter the email address of the administrator.
- For Fusion Support, this is typically support@fusionrms.com
When installing POS server tenants, Fusion Support should follow checklists to ensure that all steps are required and tracked (e.g. passwords in the password manager).
Single Tenant Options
When configuring a single tenant, the database options should point to the database for the tenant. When integrated with the Fusion Register, this is the Fusion register store or corporate database.
In this case, the Database Type is SQL Server, and the connection string should point to that database.
For SQL Server, the connection string must be configured to support multiple active result sets. The connection string should include the following parameter: MultipleActiveResultSets=True.
Multi Tenant Options
When configuring the default tenant for a multi-tenant installation, you will want to specify different database options.
The default tenant in a multi-tenant installation is dedicated to managing the other tenants. It must have its own database – you do not want to reference the register store or corporate database.
You have two options. The most common is that you:
- Manually create an independent SQL Server database.
- Select SQL Server as the database type.
- Set the connection string to point to that independent database.
This option should be used in most cases, so that you can include the database in any IT backup schedules that your organization may perform.
A simpler alternative is to just use the Sqlite database type. This option does not require a manual step to create the database – POS will create an internal Sqlite database automatically. This option is particularly good for test and staging environments.