


Order Sync in Magento
Order Sync in Magento Connector is Bi-Directional. To access the Order Sync in Magento Connector click on the [Kensium A-M Connector] on the left panel and click on [Sync Configuration] under [Configuration].
You will have the following fields to enter the details as per the sync requirement.
|
Field |
Field Type |
Description |
|
|
Order Sync Details |
|||
|
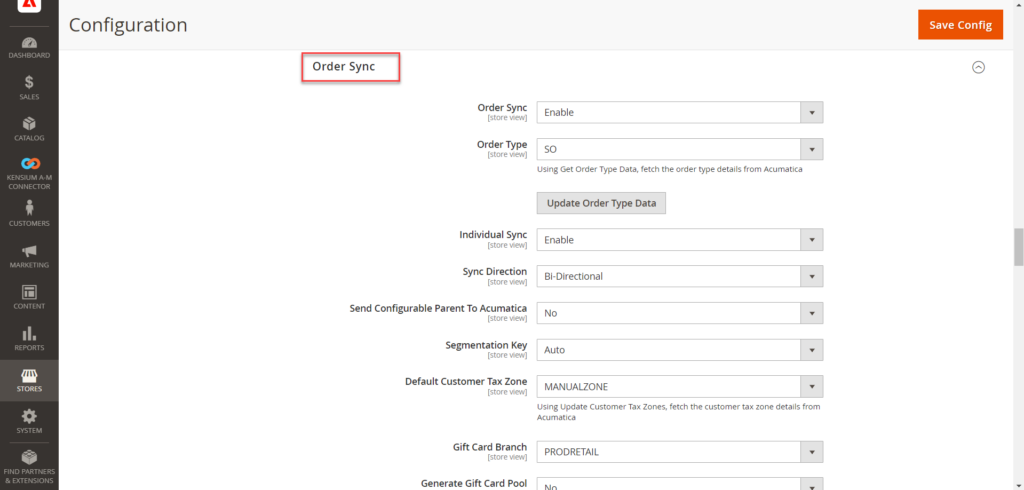
Order Sync |
Drop-down |
You will have two options.
To sync the order data, you must select the [Enable] option. Disable will stop the Order data sync process. |
|
|
Order Type |
Drop-down |
You will have multiple options in the drop-down like SO, CR, CT etc. This will determine to get the order type data and fetch the order type details from Acumatica. When we are creating an order from Magento to Acumatica we already have different types of order types within Acumatica. For example, if the user has created an order type with SO in the e-commerce Site, then in Acumatica SO order type will be created. Note that, in Magento, we don’t have any Order Type, however in Acumatica we have specific Order types. |
|
|
Update Order Type Data |
Button |
This will fetch all the Order Types from Acumatica. |
|
|
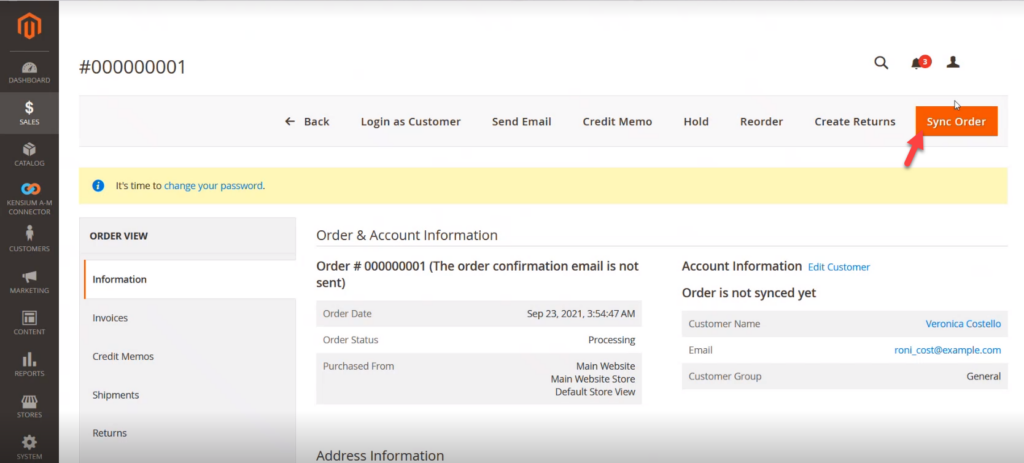
Individual Sync |
Drop-down |
You will have two options in the drop-down.
By default, you should select the [Enable] option. If enable is selected from the drop-down the [Sync Oder] button should be enabled at the top right corner of the Order page. Go to Sales-> Orders-> View -> Sync Order button should be enabled. You can individually Sync each order. If [Disable] the sync order option will not be visible. |
|
 |
|||
|
Sync Direction |
Drop-down |
Sync Direction will be Bi-Directional. You will have the following options under the drop-down.
So, if you choose Bi-Directional the order data will be synced both ways. |
|
|
Segmentation Key |
Drop-down |
A segmentation key is used to send Sales Order Numbering. You will have two options in the drop-down.
If you select auto the system will generate the Sales Order number automatically from Acumatica. However, if you choose manual a new field will appear on the screen to enter the Prefix. If it’s set to Auto in Acumatica also it should be set to Auto for seamless integration. |
|
|
Order Prefix * |
Textbox |
This field should only be enabled if you select Manual. The Prefix should be added here. For example, you can enter as an MA. So, the order number will be MA followed by the number. |
|
|
Default Customer Tax Zone |
Drop-down |
There are different Tax zones based on the location within Acumatica. Use the Manual Tax Zone. This will help you map or sync the data more accurately. To make sure the Order Total placed in E-Commerce and Acumatica is the same. So, we recommend you set up the Tax Zone manually to eliminate the chances of the difference in terms of tax. Though the drop-down will provide the different Tax Zones, however, if you are sure about the zone then you can select the tax zone. Otherwise, select the Manual Tax Zone. |
|
|
Update Customer Tax Zone Data |
Button |
By clicking on the button, the customer tax zone data will be refreshed and updated. |
|
|
Update Tax ID |
Drop-down |
We strongly recommend selecting the default Tax ID as Manual. Because based on the tax zone of the customer it varies within Acumatica as per the Tax legislation. When we are passing data from Magento to Acumatica it’s better to set the Default Tax update ID as Manual. Otherwise, due to variations in the tax rate, we might end up with a difference in the tax amount. Manual selection will avoid this. If the user is sure about the Tax ID only, then they can select the ID from the drop-down. |
|
|
Update Tax ID Data |
Button |
Clicking upon this button the TAX ID will be refreshed and updated once you make any change. |
|
|
Default Sales Account |
Drop-down |
Select the default sales account code set in Acumatica. While syncing the data from Magento to Acumatica the sales account code will be considered for the transaction. In the drop-down, you will have multiple Sales Account codes. Select the one which you want to make the default. |
|
|
Update Sales Account Data |
Button |
This button will refresh and update the sales account data upon clicking. |
|
|
Default Payment Method |
Drop-down |
You must select the default payment method as check*. Due to customer security, we strongly recommend not selecting credit card details. During the sync process from Magento, it goes to the connector and from the Connector it reaches Acumatica. In Acumatica we don’t want to save the customer’s credit card details. You will have a couple of options in the drop-down. |
|
|
Update Payment Method Data |
Button |
This button will update the payment method data. |
|
|
Default Cash Account |
Drop-down |
Like the default sales account you need to select the default cash account for the transaction to be passed from Magento to Acumatica. If the cash account is not mapped, then the value you have selected will be considered. |
|
|
Update Cash Account Data |
Button |
This button will enable the Updated Cash Account Data. |
|
|
Order Status |
List |
The Order status comes with a list of options as follows:
You can select the order status to indicate which order status should be picked by the connector to sync it to Acumatica. E.g., if the order is Completed then the connector will pick the order and sync it to Acumatica. If you haven’t selected the On Hold Order the order is not eligible to sync. In the configuration, you need to define the status and you can select Completed, Open and On Hold orders to be synced. The rest of the orders will not be picked up by the connector to sync with Acumatica. You will have both the Acumatica Order ID and the Magento Order ID and can be viewed on both sides. |
|
|
Gift Card Payment Method |
Drop-down |
For any Gift Card Payment that you want to sync through the connector to Acumatica, you must select Cash. You will have multiple options from the drop-down, however, we recommend you choose cash. |
|
|
Update Payment Method Data |
Button |
Upon clicking on the button, it should refresh the updated payment method. |
|
|
Gift Card Cash Account |
Drop-down |
Choose the Gift card Cash Account from here. Multiple options will be available under the drop-down. |
|
|
Update Cash Account Data |
Button |
Upon clicking the button, the application will update the Cash Account Data. |
|
|
Send Order Confirmation Email |
Drop-down |
When you are placing an order and synching the same to Acumatica from Magento through the connector you can send an email notification to the registered customer through mail. You will have two options in the drop-down.
|
|
|
Send Invoice Confirmation Email |
Drop-down |
If the Invoice has been generated from Acumatica to Magento and if you want to send an email to the customer select [Yes]. Otherwise, select [No]. |
|
|
Acumatica to Magento Order Payment Method |
Drop-down |
You will have multiple options in the drop-down. However, we strongly recommend that always choose to check/ money order as the order payment method. As we don’t store sensitive information like credit card details in Acumatica always select [Check] or [Money Order]. |
|
|
Use the above payment method in the Checkout |
Drop-down |
To display on the Checkout page, select [Yes] from the drop-down. Else, select [No]. |
|
|
Taxable Tax Category |
Textbox |
When a sales order is created in Acumatica requires a [Tax Category]. The tax category value will be used when the product tax category is not mapped and has multiple taxes. So, if the product is Taxable enter the tax category which should be displayed in the Sales Order of Acumatica. |
|
|
Non-Taxable Tax Category |
Textbox |
If the product comes under a non-taxable category, you need to define the non-taxable category. This should be displayed in the Sales Order under the Taxable column within Acumatica. |
|
|
Shipping Terms |
Textbox |
Within Acumatica in the sales order under the Shipping Tab, the [Shipping Terms] will be available. Also in the Customer section, you will find the Shipping terms. So, the shipping terms which are available within Acumatica will create a difference in terms of the freight charges. So, to avoid this mismatch in terms of the value we recommend you use No Shipping. This value will be passed from Magento to Acumatica and override the existing value. There will be no additional freight charges. |
|
|
Send Warehouse to Acumatica Order |
Drop-down |
You will have two options.
|
|
|
Warehouse (Optional) |
Drop-down |
You will have a couple of options as Warehouse. The value which we are passing from Magento to Acumatica should be reflected in the Order screen within Acumatica when it’s enabled irrespective of the default selection against the product. |
|
|
Update Warehouse Data |
Button |
Upon clicking on the button, it will refresh the data. |
|
|
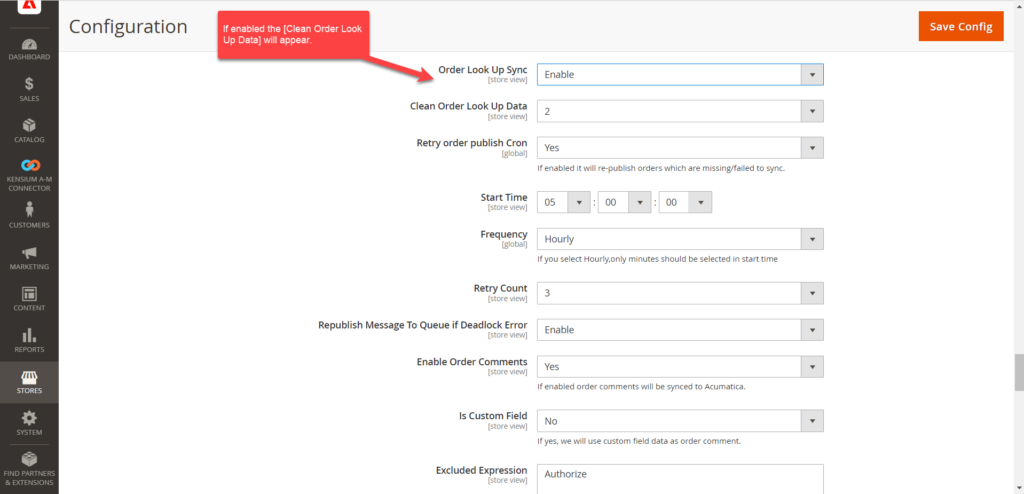
Order Look Up Sync |
Drop-down |
The order Look Up Sync refers to order edit. You will have two options.
|
|
 |
|||
|
Clean Order Look Up Data |
Drop-down |
From the drop-down, you will get the number of days to clean up the order look-up data. You will get the following numeric values [Days]. This will enhance the performance.
|
|
|
Retry order publish Cron |
Drop-down |
You will have two options in the drop-down.
In case the order sync gets failed you don’t have to do it manually again. |
|
![If [Yes] is selected the following field will appear](/wp-content/uploads/2023/12/If-Yes-is-selected-the-following-field-will-appear-1024x492.png) |
|||
|
Start Time |
Time picker |
Define the start time from here to initiate the automated product re-sync process. |
|
|
Frequency |
Drop-down |
Based on the frequency the automatic resync process will be initiated. You will have the following drop-down predefined values.
For, if the order fails and 10:00 A.M. and the frequency is set to Hourly again at 11:00 A.M., the system will automatically initiate the re-sync. |
|
|
Retry Count |
Drop-down |
Based on the count that you have selected the application will initiate to retry to pass the order. The drop-down will give you a value from a range of [3-9]. So if you set the retry count to 4 then 4 times the application will attempt the re-sync if it gets failed. In case it gets passed on 2nd iteration application will not take any further attempts. |
|
|
Republish Message to Queue if Deadlock Error |
Drop-down |
You will have the following options.
|
|
|
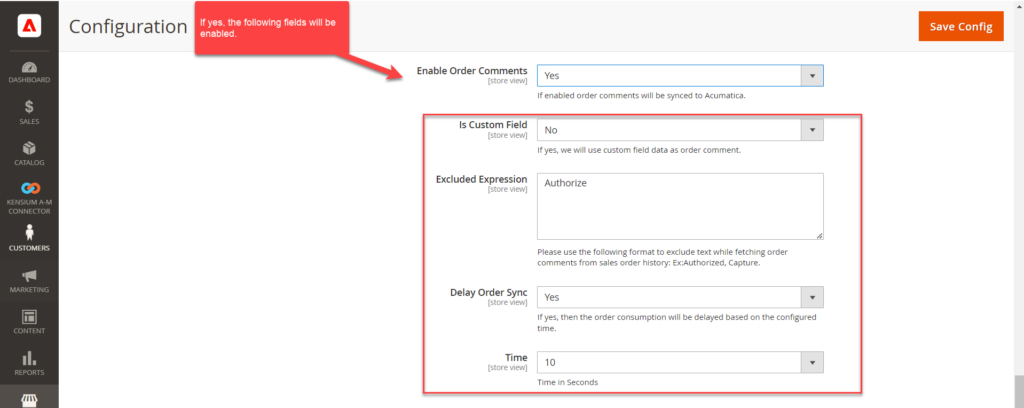
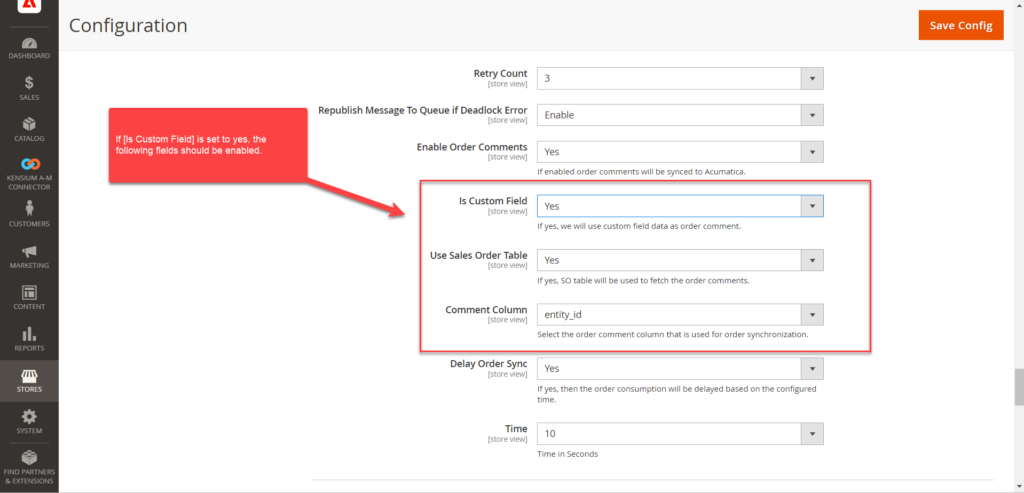
Enable Order Comments |
Drop-down |
You will have two options.
You can choose the option to enter the Order Comments in Magento. If you select yes, it will enable ordered data comments to be synced to Acumatica. If you select No, then [Is Custom Field] and [Excluded Expression will not appear]. |
|
 |
|||
|
Is Customer Field |
Drop-down |
This option will have the following values.
By default, this field should be selected as No. |
|
|
Excluded Expression |
Excluded Expression is a feature by which you can exclude the expression within Magento by using the text box. So, the comments that you would like to be excluded should be entered into the text field. The data which you don’t want to sync with Acumatica should be excluded from here. If it’s multiple comments in the order that you want to exclude use the comma separator. The data entered in the text box will not be passed to Acumatica from Magento. If you select Yes, then the following fields will appear on the screen. |
||
 |
|||
|
User Sales Order Table |
Drop-down |
By default, this should be set to [Yes]. It implies the same Magento order table (dB table) the comment column will show the Comment Column table names. If you are using a third-party application, then you need to select the option [No]. |
|
|
Comment Column |
Drop-down |
The comment columns include the entity_id, store_id, state, status etc. |
|
|
Table Name |
Drop-down |
In case you don’t have the same table or using any third-party table you need to select [No] from the drop-down. |
|
|
Entity Column |
Textbox |
You need to copy the table name and paste it here. We recommend taking the help of the database administrator to get the actual table name. For example, if the table name is sales_order_payment you need to type the table name in the textbox. |
|
|
Reference Column |
Drop-down |
You need to select which column is the entity id here. If you have selected increment ID, then you need to refer to the increment ID. You need to select the column of the table which is used to join the SO table. |
|
|
Comment Column |
Drop-down |
After entering the entity column, you need to select the respective comment column name. |
|
|
Delay Order Sync |
Drop-down |
You will have two options [Yes] & [No]. If you select [Yes] then the order consumption will be delayed based on the configured time. |
|
|
Time |
Drop-down |
Based on the time set to the delay order sync will be impacted. The measurable units of time will be in seconds. For example, if you set it to 10 sec the sync will take place after 10 secs. |
Shipment Sync: This is always a single directional sync which is from Acumatica to Magento. You will get two options in the drop-down.
|
|
Send Shipment Confirmation Email |
Drop-down |
This is always a single directional sync which is from Acumatica to Magento. You will get two options in the drop-down.
|
|
|
Republish Message To Queue if Deadlock Error |
Drop-down |
You will get two options in the drop-down.
|
|
|
Returns Sync (Hold) |
|||
|
Return Sync |
Drop-down |
||
|
Individual Sync |
|||
|
Segmentation Key |
|||
|
Order Prefix |
|||
|
Returns Statues Sync to Acumatica |
List |
||
|
Send Return Confirmation Email |
|||
|
Auto Authorize Returns |
|||
|
Credit Memo |
|||
|
Credit memo Creation Type |
|||
|
Republish Message to Queue if Deadlock Error |
|||