


Configuring Connector in Acumatica
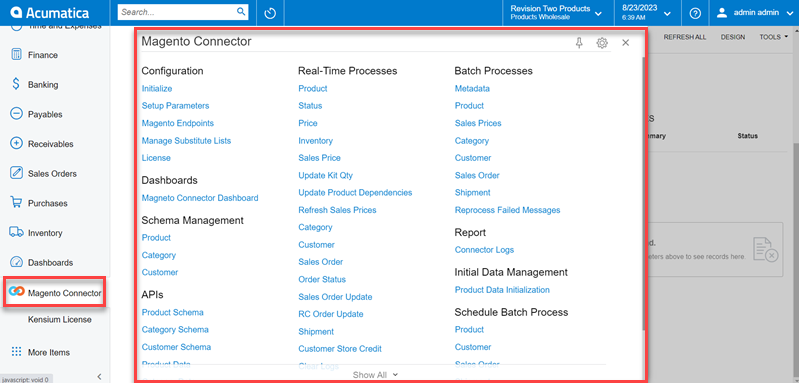
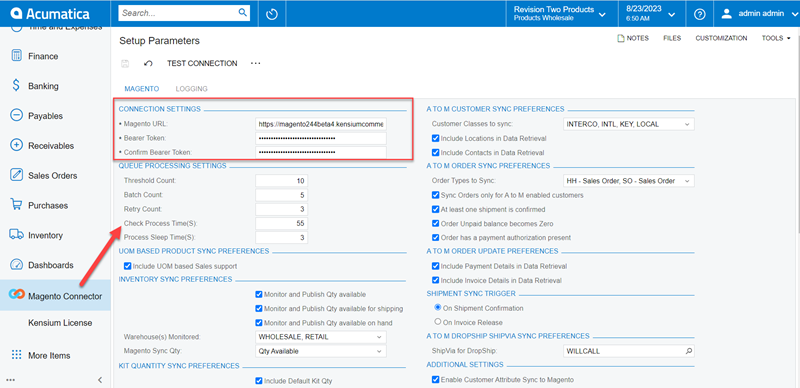
To configure the Magento (Adobe) connector first you need to set up the parameters of the connector. You need to navigate to the Magento (Adobe) Connector workspace and click on [Setup Parameters]. Navigate to the Connection Settings section.
-
-
-
Enter the Magento URL.
- This is the store URL for the Magento eCommerce website.
-
Enter the Bearer Token.
-
The Bearer Token can be found on the Magento site.
- Navigate to the System workspace on the Magento Site.
- Click [Integrations] under the Extensions workspace.
- Click the Pencil Icon next to the ACE integration.
- The Bearer Token will be listed under the Access Token field.
- Enter the Bearer Token again to Confirm the Bearer Token.
-
The Bearer Token can be found on the Magento site.
-
Click Test Connection.
- A success message will be shown when the connection is successful.
-
Enter the Magento URL.
-
Now you need to navigate to the [Queue Processing Settings] section.
|
Field |
Description |
|
Enter a Threshold Count. |
The Threshold Count value indicates the number of records that will be sent individually from Acumatica to Magento before the records are batched. (e.g., if 50 records are being sent, and the threshold count is 25, then the records are batched by using the count defined in the Batch count value and sent to Magento. If the batch count defined is 25, then Acumatica batches 25 messages in one request and makes only 2 requests to Magento.) This setting is applicable only for the Pricing and Inventory sync. |
|
Enter a Batch Count |
The batch count value indicates how many records will be added to an FTP call for bulk record sync. This reduces sync time by making multiple, smaller FTP calls. (e.g., if syncing 50 records, the threshold count is set to 25, and the batch count is set to 5, the 50 records will be sent in 10 API calls, each containing 5 records to be synced.). This setting is applicable only for the Pricing and Inventory sync. |
|
Enter a Retry Count |
This value is the number of times Acumatica attempts to send a message to Magento before rendering it as a Failed message. All failed messages are not attempted automatically by the application. To process any Failed messages, you can use the Reprocess Failed Messages screen in the Magento Connector workplace. |
|
Enter a Check Process Time |
The accepted value for this option is between 1 and 59. This value defines the frequency in several seconds for which a schedule once initiated by the framework continues to execute. All schedulers defined by the Magento Connector are scheduled to run every 1 minute. This setting is an extension of the default schedule to define if the process should be slowed down and controlled. When the framework initiates a scheduler as per the defined schedules, the scheduler first completes the designated task. It then checks for the time for which the process should continue to run based on the already elapsed time versus the defined check process time. If the already elapsed time is less than the Check process time, then the scheduler thread continues to run until the time it has elapsed the time defined in the Check Process time. |
|
Enter a Process Sleep Time. |
This value is the time between check processes in seconds. (e.g., if the check process time is 50 seconds and the process sleep time is 5 seconds, the connector will finish the expected tasks when it launches. Once the task is completed, it sleeps for the defined amount of time and checks for any new records to be processed. This setting is controlled by the Check Process Time setting above. |
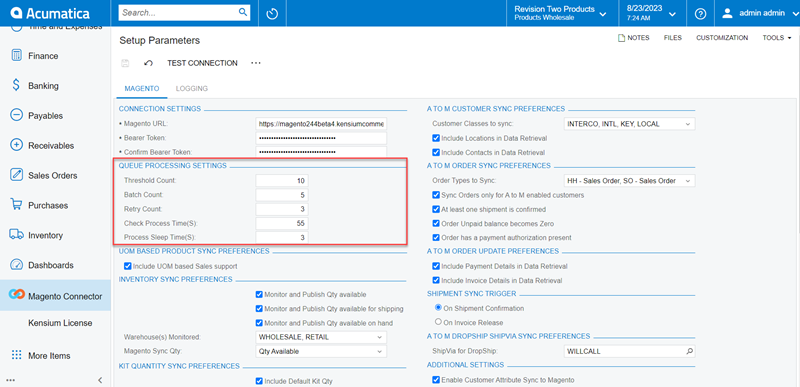
The queue processing settings are not by default and can be adjusted per the merchant’s requirements.
If utilizing the Commerce Pro package, a section will appear in the Setup Parameters screen that will be unique to this package: Price Sync Preferences.
-
Toggle the selection of price to sync with the connector.
- Default Price
-
Sales Price
- The item’s Sales Price is listed on the stock item screen. This can be configured during the configuration of the CommercePro Package.
Next, navigate to the Inventory Sync Preferences.
-
-
Execute sync based on the following configuration.
-
Select the monitor and Publish settings for Quantity. This is the value that gets published to Magento as the default available quantity for a product.
- Quantity Available
- Quantity Available for Shipping
- Quantity Available on Hand
- Select the warehouse(s) to be monitored by the connector.
- Select the Magento Sync quantity value.
-
Select the monitor and Publish settings for Quantity. This is the value that gets published to Magento as the default available quantity for a product.
-
Execute sync based on the following configuration.
Navigate to the Shipment Sync Trigger section:
-
Select a shipment sync trigger.
- Shipments will sync between Acumatica and Magento based on the setting selection on this screen. Shipment syncs will occur on the shipment confirmation or the invoice release.
Navigate to the A to M Customer Sync Preferences section.
1. Select the Customer Class(es) that will be synced with Magento.
Navigate to the A to M Order Sync Preferences section.
- Select the Order Type(s) that will be synced with Magento.
Navigate to the A to M Dropship ShipVia Sync Preferences section.
-
Select a ShipVia method for Dropship orders.
- A ShipVia method must be selected for Dropship orders to ensure proper syncs from Acumatica to Magento. By default, Magento does not have a shipping method to represent Dropship shipments. This allows a user to define a customer shipping method in Magento and then map it with the defined incoming value from Acumatica.
Navigate to the Additional Settings section.
-
Toggle the Enable Customer Attribute Sync to Magento box.
- This feature will allow customer attributes to sync to Magento from Acumatica.
|
|
Customer Attributes are available and supported only with Magento Enterprise Edition. |
Navigate to the Individual Sync Status section.
This section allows the user to toggle on the type of sync that will occur based on the business need.
1. Toggle on the Active box next to the entity that needs to be enabled for sync.
After configuration completion of all the preferences [Save] it.
Kit Quantity Sync Preferences:
The Kit Quantity Sync Preferences will check the Kit Quantity through a sync process with Magento. This includes the following field with a checkbox.
- Include Kit Quantity (Checkbox)
- Include Possible Kit Quantity Components (Checkbox)
When both these options are checked Acumatica will check with Magento through a sync method. After validating and checking the Kit Quantity Value and possible Kit Quantity Component should be displayed on Magento.
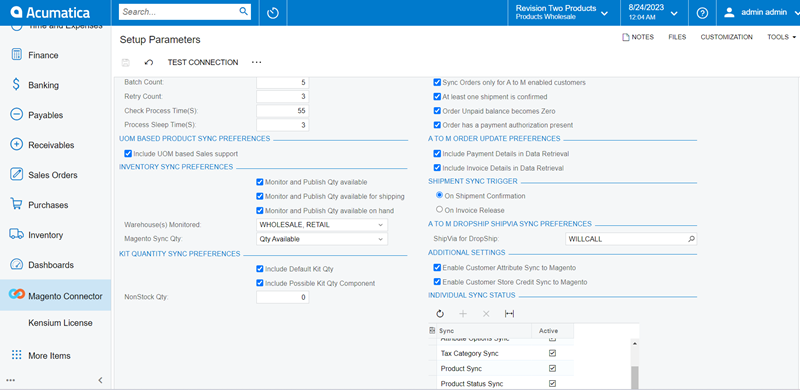
- Non-Stock Qty [Text box]: The text box is for the Non-Stock Qty. By default, the value should be Zero.