


Mapping Customer Schema
Customer schema must be mapped to ensure that customer data is properly synced between Acumatica and Magento. To begin, navigate to the Magento Connector workspace in Acumatica and select Customers under the Schema Management section.
-
Click Refresh Schema.
- The attributes will refresh successfully with a green checkmark.
- Toggle the Active box next to the attribute that must be mapped.
- Click Save.
- Select a Store View in the top left-hand corner.
-
Click Update Schema.
- If the Magento Customer Attribute already exists for the Acumatica Customer Attribute, skip stepping 8.
-
Click Get New Attributes
- The list of unmapped attributes from Acumatica will be rendered.
- Click Create next to the Acumatica attribute that will be made into a Magento attribute.
-
Under Attribute Properties
-
Enter a Default Label
- This is the display name of the attribute.
-
Enter an Attribute Code
- This is an internal documentation of the attribute.
-
Enter an Input Type option.
- This is the type of attribute that has been created in Acumatica (combo, multi combo, etc.).
-
Enter a Default Label
-
Under Storefront Properties.
- Enter a Show on Storefront Option.
-
Enter a Sort Order.
- This will designate where the attribute will appear in conjunction with other attributes if visible on the storefront.
-
Enter a Form to Use In.
- This will designate where the attribute will appear.
- Click Save Attribute. The Magento Attribute will now be created based on the information from the Acumatica Attribute and appear in the Magento Customer Attribute column of the Customer Attribute Mapping page.
- Click Update Schema.
- Click Map Attributes.
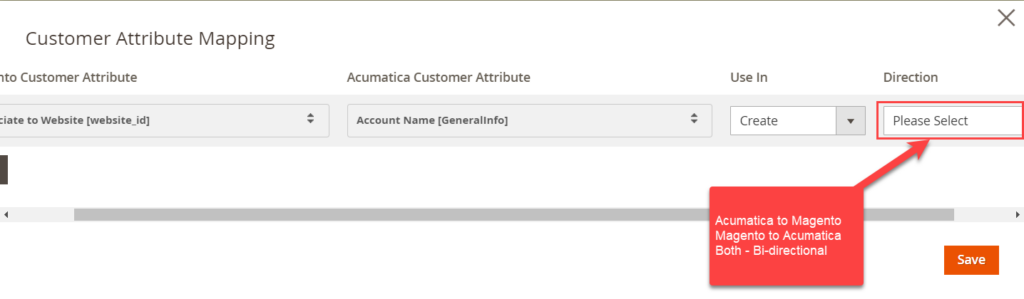
- Select a Magento Customer Attribute.
- Select an Acumatica Customer Attribute.
-
Select a Direction.
- This will allow a user to determine the direction of metadata syncs for individual product attributes.
- Click Save.
Next, navigate to the Kensium A-M Connector workspace in Magento and click Customer under the Mapping section.
The saving of the value of the attributes will be mapped.