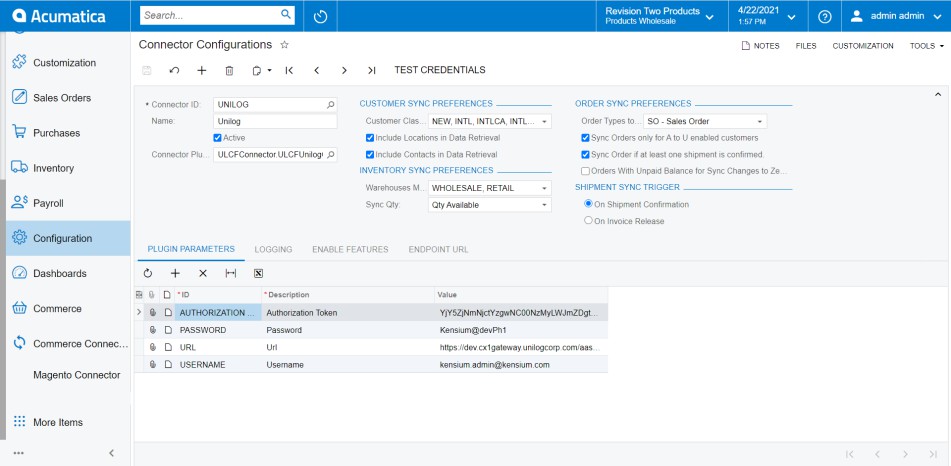
Configuring The Connector In Acumatica
The first step in configuring the KCF is to set up the parameters of the connector. Navigate to the [Commerce Connector] workspace and click [Connector Configuration].
-
Enter a [Connector ID] for the connector being established.
- It is considered best practice to use a Connector ID that is indicative of the connector being used.
- Enter a Name for the [Connector].
- Toggle ON the [Active box].
-
Select the Connector Plugin to be used.
- The Connector Plugin may be a separate package to implement during the installation of the KCF Package.
- Next, navigate to the [Customer Sync Preferences section].
- Select the Customer Classes to Sync.
- Toggle [ON/OFF] Include Locations in Data Retrieval based on business need.
- When toggled on, Customer Locations will be included when the customer sync is executed.
- Toggle ON/OFF Include Contacts in Data Retrieval based on business need.
- When toggled on, Customer Contacts will be included when the customer sync is executed. Next, navigate to the [Inventory Sync Preferences Section].
- Select the [Warehouses] Monitored.
- Select the Sync Qty to be used for sync. Next, navigate to the [Order Sync Preferences section].
- Select the [Order Types] to Sync.
- Toggle [ON/OFF] Sync Orders only for A to U enabled customers feature based on business need.
- When toggled on, this feature will only sync orders from customers that have been synced from Acumatica to the designated commerce platform.
- Toggle [ON/OFF] Sync Order if at least one shipment is confirmed based on business need.
- When toggled on, this feature will allow orders with multiple shipments to sync if one of these shipments is confirmed.
- Toggle [ON/OFF] orders with unpaid Balance for Sync Changes to Zero.
- Next, navigate to the Shipment Sync Trigger section.
- Select the Shipment trigger based on business process.
- Shipments can sync upon Shipment Confirmation or upon Release of the associated invoice.
-
Next, navigate to the Plugin Parameters tab. These parameters are the API tokens and login information for the selected commerce integration.
- Enter the [Authorization Token].
- Enter the [Password].
- Enter the [URL].
- Enter the [Username].
- Next, navigate to the [Logging tab].
- Toggle [ON/OFF] Log Info Level based on business need.
- When toggled on, all Info level actions will be logged by the connector in Acumatica. This includes all successful transmissions of data between Acumatica and the commerce platform.
- Toggle [ON/OFF] Log Error Level based on business need.
- When toggled on, all Error level actions will be logged by the connector in Acumatica. This includes all unsuccessful transmissions of data between Acumatica and the commerce platform. Next, navigate to the [Enable Features tab].
- Toggle [ON] all syncs that will be used for the business need.
- The connector will execute syncs if the sync feature is enabled in this section.
- Next, navigate to the Endpoint URL tab. These fields will automatically populate with the Endpoint URLs being used based on the Plugin selected at the beginning of configuration and the base URL entered.
- The Connector is now ready to have the connection tested, and the schema configured.