


Paying A Vendor with AMEX Extend API
-
To pay a vendor using AMEX Extend, navigate to the Payables workspace.
-
Under Profiles, click Vendors.
-
You can create a new vendor and set AMEX Extend as the default payment method, or you can edit an existing vendor to change AMEX Extend to the default payment method.
-
On the Vendors screen, select the Payment tab.
-
Under Default Payment Settings, set the Payment Method to AMEXTND.
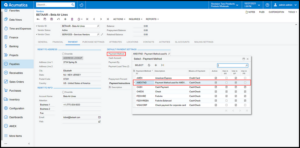
Note: You MUST enter, or verify, that there is an email address for the vendor listed in the Remit-To-Info section. Virtual card details will be sent to this email address.
Purchase Orders (POs)
-
To pay a vendor using AMEX Extend, create a new PO or open an existing PO.
-
After removing the hold and approving the PO (if necessary), click Enter PO Receipt
-
On the Purchase Receipts screen, make sure the Create Bill check box is selected and click Release.
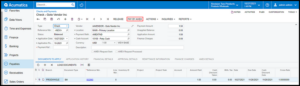
4. Go to Payables > Bills and Adjustments > and click the ref. number to open the bill.
5. Remove the hold, then click Pay.
When viewing a bill, click Pay
6. Clicking Pay will take you to the Checks and Payments screen.
Checks and Payments Screen
-
On the Checks and Payments screen, click Remove Hold.
-
After removing the hold, save the record and enter the payment ref. number and a payment description.
If you have multiple bills to pay for this same vendor, you can click Load Documents
to add them to this payment.
3. Verify that the selected payment method is AMEXTND.
Verify that the current payment method is AMEXTND
4. Click Pay By AMEX.
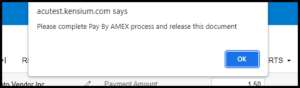
When your payment method is set to AMEXTND, the Release button will not work. Clicking the Release button will display a warning message.
-
Select the AmEx card that you would like to use to create a virtual card.
-
Available cards and card names will appear as they are entered int
-
o your Extend portal.
-
-
Set the active until date.
-
Enter any notes for the virtual card.
-
Click Create Virtual Card.
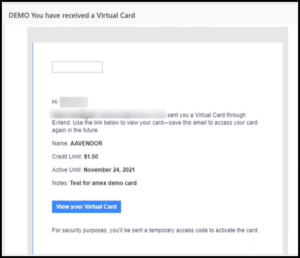
6. An email with the newly created virtual credit card details will be sent to the vendor’s email.
Note:
-
The box of the AMEX request sent will now be checked on the Checks
-
and Payments screen
-
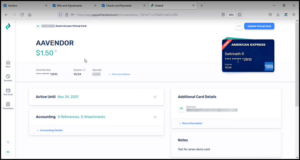
Details for the virtual credit card (ID, last 4 digits, exp. date) are now available to view in the AMEX Details tab.
Request Status Check Boxes
The AMEX Request Sent and AMEX Request Processed check boxes will provide you with the current status of your AMEX Extend payment.
-
AMEX Request Sent will become checked once a virtual card is created and the email has been sent to the vendor.
-
AMEX Request Processed will become checked after you process the virtual card transaction.
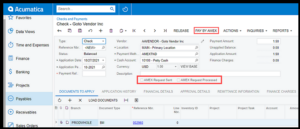
AMEX Request Sent and Request Processed check boxes. These provide a visual representation of the status of the payment.
Extend User Portal
The Extend User Portal is only available to those who have been given direct access to manage the credit cards and general configuration of the package.
Note: Vendors receiving payment are not able to access your Extend User
VIEW VIRTUAL CARDS
When you log into your Extend portal, you will be able to view all virtual cards that have been created and any related transaction information.
Using Virtual Cards
After you click the Create Virtual Card button in Acumatica, an email will be sent to the email on file for the selected vendor.
Access the Virtual Credit Card
-
Click the View your Virtual Card button in the email from Extend.
-
The recipient of the email will then need to generate
-
The code will be sent to the same email as the card.
-
-
ate a security code.
-
Enter the generated security code.
-
Click submit to view the virtual credit card details.gfgfhg
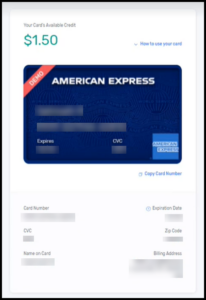
Virtual credit card details (vendor view)